

Chocolate Chip Cookie Shots


Ingredients
Cookie dough
Chocolate royal icing
Preparation
Cookie Dough
-
In a stand mixer fitted with paddle attachment, combine butter, sugar, brown sugar and mix on medium speed until well combined, about 1 minute. The mixture should be fluffy and become lighter in color.
-
Add the eggs, mix on low speed until combined. Scrape down the sides of the bowl with a rubber spatula, then continue mixing for 15 more seconds.
-
Add flour, salt, baking soda, mix on low speed until just combined. Scrape down the sides of the bowl, then continue mixing for 15 more seconds. Do not overmix (the more you mix, the tougher the cookie will be).
Shape the Cookie Shots & bake
-
Pre-heat oven to 350°F (175°C).
-
Remove chilled dough from the fridge. Flour your work surface, roll out dough with a rolling pin to a rectangle that’s ½ cm (¼ inch) thick. Using a sharp knife, cut the dough into rectangles that are 13 cm wide X 8 cm tall (5⅛ inch X 3⅕ inch). (If dough is getting too soft, put back in the fridge for 10 min until chilled.)
-
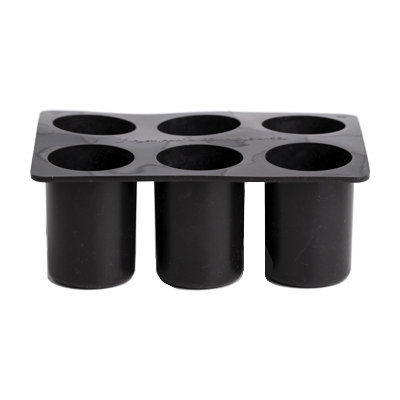
Place the rectangles inside each individual Flexipan Cookie Shot mold cavity, making sure the bottom edge reaches all the way down into the bottom of the mold. Use your fingers to gently press the top edges of the dough towards the center, creating a flat and level seal (this will become the bottom of your Cookie Shot. You should not see any of the silicone mold peeking through the top of the dough).
-
Place onto a baking sheet. Lay a Silpat silicone mat over the Cookie Shots (this prevents the dough from rising unevenly and tops from getting too browned, and also keeps the moisture in during baking). Bake on the center rack for 20-25 minutes, rotating 180° mid-way, until the tops are golden brown. Remove from the oven and transfer to the fridge to let chill fully before unmolding, a few hours or overnight. (Do not unmold when warm, as the Cookie Shots are too soft and will tear).
-
Once fully cooled (the Cookie Shots should feel firm), unmold carefully by pushing the Cookie Shot out of the mold.
Make the chocolate royal icing
-
In a stand mixer fitted with whisk attachment (or with a mixing bowl and hand mixer), combine all ingredients and mix until light and fluffy. If the mixture feels a bit dry, add a few drops of water as needed to make a smooth consistency.
Line the Cookie Shots & serve
-
Transfer the chocolate icing to a piping bag. Cut a small hole at the tip. Pipe the chocolate icing a third of the way inside each Cookie Shot, then with your finger or a thin spoon, spread the icing all around the inside of the Cookie Shot until all the surfaces are fully covered and smooth. Allow the icing to fully dry, about 1 hour.
-
Once the icing has dried, fill with your favorite kind of milk, sip, and then eat the cookie. Cheers!
-
TIP: Once you fill the Cookie Shot with milk, drink it right away! Leaving milk sitting in the cup for more than a minute or so will cause it to get soggy and may start to leak).
-
TIP: You can also pre-heat your oven to 350°F and warm the Cookie Shot for 1 minute (max), before filling with cold milk. We serve our Cookie Shots warm at the Bakery, with cold vanilla milk, and it’s my favorite way to eat them!
Note
Storage Instructions: Best enjoyed right away. If storing, keep covered or in an airtight container in the fridge for 1-2 days; let the Shots come to room temperature or re-heat according to above instructions before enjoying).